How to build your own fitted wardrobe and also how not to do it
Building your own fitted wardrobe means you have total control over features and costs but these our big projects so you want to ensure your energies are well spent. We review ways you could go about it and also ways maybe you should not.
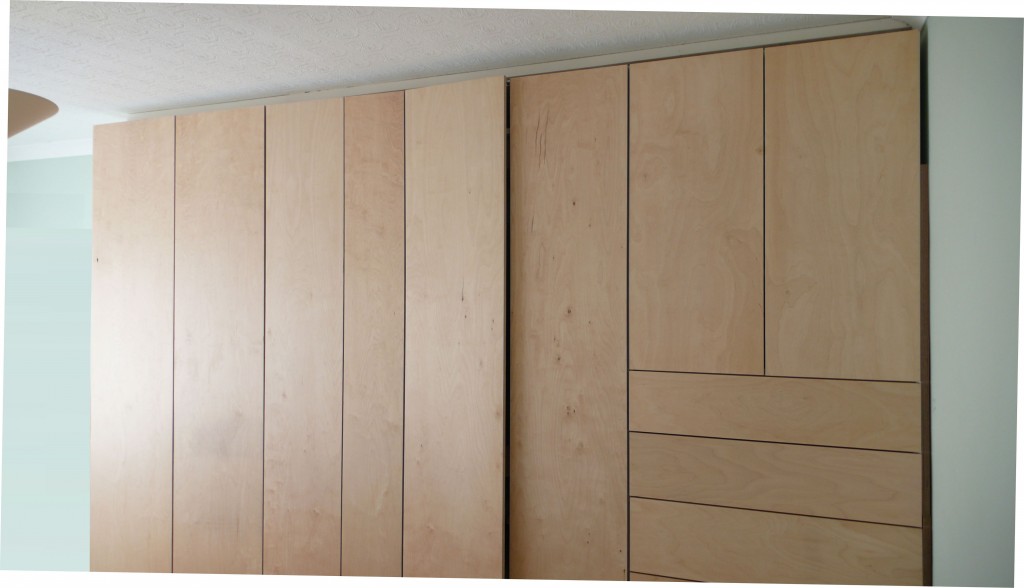
How to build your own wardrobe
1 Measure the space available – width, height and depth. Make an allowance for out of square walls/floors by reducing all your final measurements by 50mm. Ensure that doors aren’t too wide otherwise you might not be able to open them fully should a bed be nearby! Good rule of thumb is no door should be wider than 500mm. We have a design tool called the Cabinet Planner to work out the cabinetry required to fill a space.
2 Get a custom wardrobe kit from us. Tap in your sizes into our online cabinet design tool to create your own wardrobe kit. Remember if your design exceeds 1metre, start thinking about breaking it up into separate cabinets to keep each door less than 500mm wide. Much much easier to build too!
Of course we are a commercial operation so we would recommend purchasing our kit. However the alternative hardcore DIY idea of calculating a few sizes then going into B&Q to buy a couple of sheets of MDF or some ‘furniture board’ product and then attempting to join them together is full of potential pitfalls.
Now by no means is it impossible and some people will do a great job. However the problems to overcome (and we’ve built a business based on overcoming these for you) include:
The problems you may encounter building a wardrobe from scratch
– cutting sheet material (MDF, Ply, Melamine faced products) true and square without pro equipment is difficult! Hand saw no way, jigsaw too rough. A circular saw maybe, but you’ll probably need to buy a fine toothed blade to prevent chipping the material. The class of saw you need to do a good job costs £500+ (e.g. Festool TS55). You need to have a solid guide rail to run the saw against, you need to position it very accurately on the material and the material needs to be well supported as you cut to ensure accuracy.
If you use a particle board material (e.g Contiboard) you’ll need to cover the exposed cut edges with iron on edging. You need to be careful applying this so that it sticks well and you don’t damage it while trimming. Peeling, damaged edging just gets worse with time and looks terrible. Compare this to the edgebandings we apply to your cabinet parts which are 2mm thick and applied with a dedicated edge banding machine which rolls on hot melt glue before applying the edge banding under pressure.
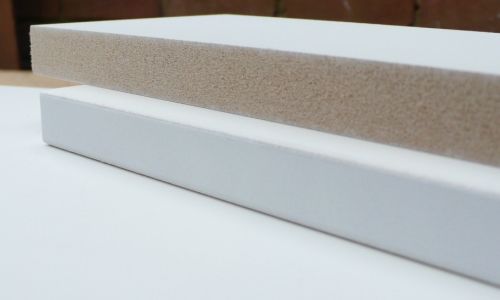
Primed and edgebanded versus not edgebanded
By the way, materials such as Contiboard available in DIY stores in terms of quality are yesterday’s product! Read more about what a quality melamine faced product should be here in our guide to high quality MFC
– If you use MDF and intend to paint you’ll need to seal the edges otherwise the finished edges will look rough. There are several ways to do this including
i) cover the edges with diluted PVA or shellac
ii) cover with solid wood
iii) keep painting and sanding (probably four coats needed). For our cabinets ordered from us we apply preparation tape with an edgebander which also applies a nice radius to give you a product that is ready for just a top coat.
– the material supplied in DIY outlets is generally 12-15mm thick. With thin material you need to be careful with horizontal spans over 500mm which unsupported will have a tendency to sag and look terrible. Better to go with 18mm thick material (as our cabinets are).
170 degree opening hinge on a kitchen unit 170 degree opening hinge on a kitchen unit
– limited range or poor quality hinges. Our standard hinge is a generous 120 degree opening. A low quality 35mm cup hinge is harder to adjust increasing the likelihood you’ll have wonky looking doors. And if you want something a bit special we can supply wide opening (170 degrees), slow closing or push to open.
– mediocre design. If you try an ambitious design from scratch you risk making sizing errors and end up spending twice as long fixing them in the build phase. If you try something very simple (basically just a box) you’ll miss out on detail resulting in something just bleh. Better to use our design tools to create interesting combinations that you know will not have any sizing errors.
Ending on a positive - suggestions on how to do it yourself
Assuming you are going to park the idea about going into a DIY store and buying sheet materials that you cut up yourself, what is the sequence of steps to build your own fitted wardrobe?
1 Spend some time thinking about the details:
-
Will you continue the room skirting along the bottom of the cabinet?
-
Will you go for a sleek handle-less design with push to open doors? It’s the details that make the difference (and add value).
2 Aim to build and finish the job in one weekend. Often these kind of jobs can hang around for a long time as you’ll have something unfinished although usable. Tips for getting the job done quickly:
– get one of our kits (of course!)
– get all the filler/scribe pieces included so you don’t spend an age trying to find bits and pieces of timber to cover gaps
– build the cabinets with screws. Still probably the quickest way since as soon as a screw is driven home it is ready and the cabinet won’t need clamping. (When we say screws we mean hi-tech modern screws that are so good you can drive them into the edge of an MDF board without the need to pre-drill – e.g Spax MDF. You won’t be able to buy these in B&Q and they cost 3 times the cost of a conventional wood screw. We include these screws in our kits.)
– get a helper to help you carry all the parts into the room where the wardrobe will be installed. All the parts for a wardrobe can easily amount to 300Kg so you want to get the material in and build the basic cabinet carcasses as fast as possible
– get the hinge holes pre-drilled (by us). Probably the most inefficient way of hanging wardrobe doors is to measure out the hinges when the carcass is already assembled: awkward, inaccurate and error prone.
Get hints and tips on designing your own fitted wardrobes by downloading our how to guides.