Made to measure furniture – a quick guide to standard sizes
The title of this article is slightly contradictory but when designing your own made to measure furniture you need to start from somewhere!
We present some de facto standard size ranges for various elements in built-in furniture and you can use these as a starting point.
Note on terminology: a built-in wardrobe comprises one or more cabinets. The recommended sizes are for the cabinets.
Recommendation : Height
2000-2500mm
Built-in made to measure wardrobes are usually designed to extend from floor to ceiling to take advantage of the available space. In UK homes this measurement tends to be around 2400mm. People lucky enough to live in grand proportioned Victorian/Georgian homes can have floor to ceiling heights of 2500mm plus.
Measure your floor to ceiling height and then factor in these two crucial points: – ceilings are often bowed. This could be due to the plasterboard sagging under its own weight or an overladen loft. Either way planning in some free space is a good idea. This space can be covered by a scribe piece strip. For a 2400mm floor to ceiling measurement, designing a wardrobe 2350mm high is recommended. – factor in headroom to enable easy assembly.
Rotating a cabinet from horizontal to vertical
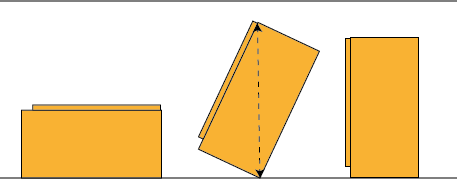
Rotating a cabinet from horizontal to vertical
Generally the easiest way to assemble a wardrobe is when it is lying horizontally on the floor then rotate it to vertical and slide into position. To ensure there is vertical space for the rotation the diagonal measurement of the wardrobe side pieces should be less than the available floor to ceiling space. As an example, a 2350mm high and 500mm deep cabinet will require a vertical space of 2402mm to rotate from horizontal to vertical. If the cabinet was 2350 high and 600mm deep then it would require 2425mm to rotate. (This is Phythagorus Theorem – space to rotate = square root of (height squared + depth squared).)
Space for drill is needed between top of cabinet and ceiling
If you don’t have the space to rotate the wardrobe you can build in the vertical. We pre-drill our wardrobe kits for dowels so the dowels keep the panels (the top/bottom and sides) registered in the correct place and assembly is a case of securing with screws. In this case it is making sure there is enough space for the body of the drill. If there is not enough space for the body of a drill then the next option is to specify ‘Rafix’ fixings so that the panels can be tightened with the turn of the screw in the fixing.
Recommendation : Width
100mm-1500mm
Firstly if you need a wardrobe greater than 1500mm this would be composed of several cabinets butted together. For example a 3metre wide wardrobe could be composed of three 1000mm wide two door cabinets. The maximum width for an individual cabinet is dictated by door width and shelf span. The recommended maximum door width for an hinged door is 750mm. This is a technical limit due to the weight of the door acting on the hinges. Also bear in mind that a wider door will require a wider space in front so that it can open fully. For example the closest position of a bed in front of a cabinet with 600mm wide doors would be 600mm which is why in some bedroom configurations the only cabinet possibility is one with sliding doors. In practice realistic door widths are in the range 350mm to 550mm. Shelves ideally should be less than 1000mm long as longer than this without some kind of reinforcement introduces the risk of sagging. Drawers don’t have the sagging risk since they are based around a rigid drawer box. With the high quality drawer runners we use we are yet to encounter to a design with a drawer that is too wide and regularly see designs withe 1000mm wide drawers.
Recommendation : Depth
300mm-800mm
The limiting factors here are ergonomics. Too shallow (less than 300mm) and you can’t store much; too deep (more than 800mm) and your arm is not long enough to reach the cabinet contents!
Recommendation : Door sizes
300mm-800mm wide
300mm-2500mm high
The maximum door width is governed by the space available for the door to swing open and the strength of the hinges. If for example the doors are 700mm wide then no beds etc can be within 700mm of the doors.
Hinge manufacturers typically don’t provide guidance for doors wider than 800mm.
The maximum door height is limited by the material we make the doors from. In MDF, sheets are available in 3metre lengths but we find a door taller than 2500mm for a wardrobe starts to get a bit ‘flappy’. If you have a space taller than 2500mm then a better solution is to have split doors with a bottom door of around 2400mm and a top door around 500mm tall. See/edit a template cabinet with split doors on our main website.
Plinths
0mm-250mm
On www.diywardrobes.co.uk we have a variable called ‘Bottom position’ which dictates whether there is a plinth or not and its size. Ideally a cabinet should be off the floor, whether it incorporates its own plinth or it is mounted on a separate plinth. Without a plinth the doors/drawers risk binding on the floor as they are opened. By default doors have a clearance of 2.5mm below them but if the floor is uneven or the cabinet sits on carpet then the binding risk is high. Kitchen cabinets usually sit on adjustable legs in the height range 100-150mm and the plinth is attached to the front of those legs. Bedroom/home office furniture doesn’t need such a high plinth and 50mm is a good start. Often it is a good idea to consider plinth height with regard to the skirting already in the room and there are a couple of options:
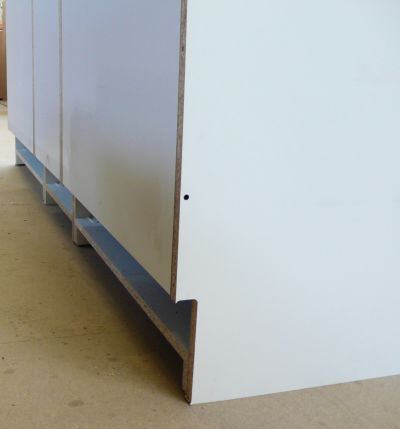
Three cabinets bolted together, each with a skirting notch of 150mm to ride above the skirting in the install location
– to avoid the need to remove skirting in the room design the cabinets with a bottom position above the existing skirting or specify a ‘skirting notch’ in our Cabinet Designer. The ‘Bottom Position’ and ‘Skirting notch height’ parameters can be different in the Cabinet Designer. Here for example the Bottom Position is 50mm giving a plinth height of 50mm and the skirting notch is 150mm to ride above the existing skirting in the room.
High plinth to allow skirting to run along bottom High plinth to allow skirting to run along bottom
Skirting run along bottom of cabinet Skirting run along bottom of cabinet
– set the bottom position above the skirting height and then run matching skirting across the plinth space to achieve a high quality built-in effect.
We have created a number of Template Cabinets that use these dimensions but at the end of the day if you want to maximise the storage and design potential of your space these are just the starting point and you’ll use the Cabinet Designer and Cabinet Planner to customise further. Nothing is average about your own project!