Painting and varnishing self built wardrobes
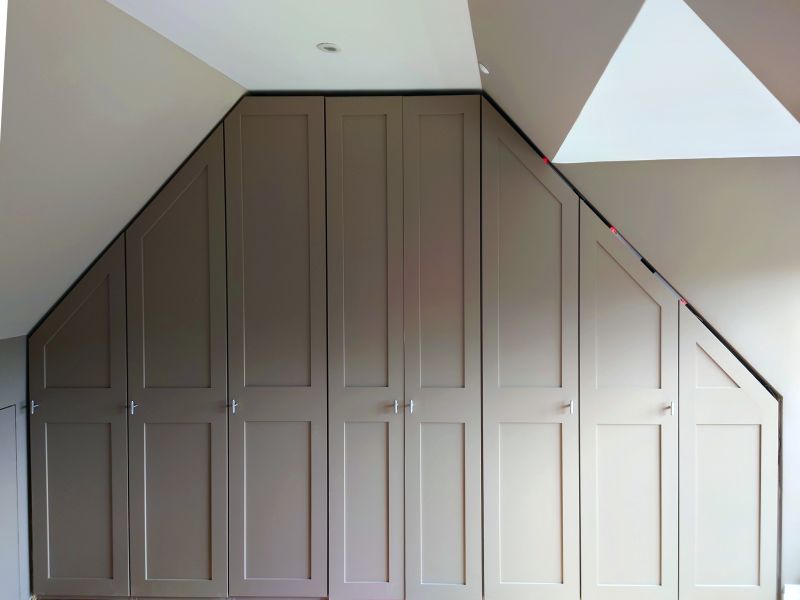
Wardrobes present a large area to paint so you need ways to minimise the task and make it efficient.
This article covers painting MDF and varnishing real wood veneered materials used in self built wardrobes.
MDF
MDF is a popular material to make wardrobes from because it is smooth and stable. MDF usually requires some kind of finish as it is prone to picking up finger marks. The detoriation process goes like this:
– sweat or oils from finger touch is absorbed into the MDF fibres
– initially the marks may not visible but then dust/dirt sticks to these marks and the surface of the MDF starts to become unsightly.
At a minimum, areas of MDF that will come into contact with fingers should be sealed. One of the simplest sealers is Shellac dissolved in methylated spirits. Water based “MDF” varnishes are also easy to use and quick drying.
MDF is an excellent substrate for paint finishes but the classic issue with painting MDF is what to do with the edges. MDF edges are relatively rough and have a huge propensity to absorb finish. Our solution is to edge band first so that the absorbency of the edges is the same as the face. then you can just start painting without further edge preparation.
The suggested paint system for MDF is:
– apply a wood primer to the bare MDF
– then apply something like an Eggshell top coat
Priming is best done before the cabinet is assembled as then you are painting every piece whilst it lays flat. The top coat is best done after the cabinet is assembled to avoid any damage during the assembly process and it gives a better finish where pieces join.
MDF is very versatile so can be painted with Emulsion if that is a better fit with your decor. Whether you paint the interior of your cabinets is a matter of personal choice and they can be left unfinished or just primed.
With doors ensure that paint is applied evenly to both sides to avoid the possibility of warping. Warping happens when the two sides of a panel absorb/emit moisture from/to the atmosphere at different rates. The amount of finish on a panel regulates this process so it can be seen that different amounts of finish on the back and front of a panel could cause unbalance.
This is very important for doors due to
i) changes in atmospheric moisture are exacerbated because there could be an additional difference inside/outside the cabinet
ii) doors are attached by hinges along one edge and the other edges can move unconstrained.
With the top/bottom/back and sides of a cabinet even amounts of finish is less important because these panels are fastened to each other. Therefore any warpage movement is constrained such that it is unnoticeable. Generally painting the inside and leaving the outside of a cabinet fitted against a wall is fine.
Finishing real wood veneers and Birch Ply
Finishing these products aims to achieve two things
i) sealing the surface
ii) producing an attractive finish.
Using a proprietary finish straight from the can it is possible to achieve both objectives fairly easily. For example Osmo oil is very easy to use. Alternatively you may want to satisfy each objective independently to build up to a particular desired end result. For example to get an even finish on Birch Ply with a water based varnish you may want to seal with Shellac first before applying the varnish. The shellac seals the surface which has the important role of controlling the absorbency of subsequent coats of varnish. Then the varnish is built up in multiple coats, perhaps rubbing down with fine grit abrasive (180-400 grit) between coats. This builds up the finish giving depth to the final result. With Birch Ply in particular, without the sealing stage finish can be absorbed into some areas more than others. Areas with greater absorbency go darker and the end result is a blotchy finish. The solution is sealing first which can be by using a dedicated sealing product or diluting the first coats of the final finish.
Wiping on a finish is almost foolproof. Here a lint free cloth is used to wipe on thin coats of finish. Each coat will dry quickly because it is so thin. Eventually the finish will build up at a rate dictated by the material’s absorption and because there will nto be an excess of finish on the surface then the possibility of blotching is almost eliminated.
Golden rules for applying finishes to wood based products
– Any panel that is not fastened to another panel should have finish applied equally to both sides, whether they are visible or not. Therefore doors should be finished both sides.
– If applying finish to the inside of cabinets ensure the finish has time to dry before use.
As a guide: Oil (e.g Danish Oil) 4 weeks Solvent based varnish/paint 1 week Water based varnish/paint 3 days
Avoid painting/varnishing if you can!
We’ve given some suggestions here on painting and varnishing but our top piece of advice is to minimise the amount you have to do.
Ideally your project should use melamine faced chipboard (MFC) for the bulk of the project. MFC is available in a wide range of colours and grain effects and doesn’t require any finish. And the quality of premium MFC is extremely good. If you want a painted/varnish finish to match existing decor then choose an MFC for the carcass and MDF/veneer for the doors/drawer faces.
This will save you litres of paint/varnish as well as dramatically decrease the install time. Also MFC is more hard-wearing than most painted finishes.